Revert back to your local account – disconnect from your Microsoft account
In the following example, John Doe with email-address: John.Doe@example.com decides to disconnect his Windows 10 account on his PC at home from his account at Microsoft which he established some time ago. His user name and folder remain having his full name: John Doe.
Preparation
As always, make sure you have at least one verified backup at hand. I decided to create a cloned disk and applied the actions that follow onto that cloned disk before going live. This to be sure that I get back online no matter what happens – just in case.
In any case and before you start perform 2 additional steps of precaution.
Log-in with administrative privileges, export the complete registry and make sure it will remain available to you.
Also create a restore point before you go on.
The concept
Restoring your original local account involves 3 steps whereas the last step is optional.
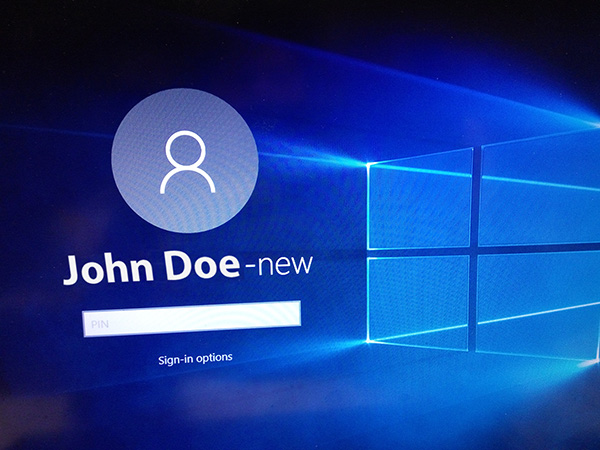
In the 1st. step John Doe creates a new user name which is comprised of his existing user name and adding the term -new resulting in John Doe-new.
In the 2nd. step John Doe-new gets renamed to John Doe using a tool named netplwiz while logged in as Administrator.
In the last optional step John Doe may decide whether to keep or remove his Microsoft account and services connected to it.
Let’s do it
To begin log-in with the account that is connected with the Microsoft account.
After start-up and log-in go to Settings / Accounts and select to Sign in with a local account instead

Windows will ask for your password. Use the password for your Microsoft account and NOT the password of your local account.

Next up is that Windows will ask you to create a new local account.
Yes, that is very irritating, because that is not according to our intention. However, yes DO create a new local account. I decided to use my existing account user name and simply added the term –new to the end of the user name and then also entered the required password hint.


Feel confident it will work as anticipated.Click on Sign out and finish.
Windows will now perform a log-out and present you the log-in screen prompting the newly created local account ID. Here you MUST log-in and use that password you have created in the previous step.
Most likely the log-in will be successful and your familiar 'old' Desktop is presented to you. Well it’s exactly the same as just before except that the log-in name has changed.
All your settings are here perfectly positioned as if nothing has changed. Even looking under the hood there is no visible change.
Take a look at the folder structure and you will find the structure to be unchanged just as it was before. Great, isn’t it.

Change the account name
What’s that’s left to do is getting rid of that new account name and obtain the original user name.
For this there are 2 options.
One is extremely easy, the later turns your Windows environment to what it was before.
Both are described at answers.microsoft.com: rename-user-account-folder-in-windows-10. The same is repeated here for completeness of this article.
The following URL takes you to single page describing the 1st. option. rename user account (this also applies to Windows 10).
The difference between the 2 options is that the 1st. method kind of mimics the user name the 2nd method really changes the user name. None of the 2 options will touch your folder structure.
The question arises: Which option or method to choose?
If you want your original user name back, the name that is used to equally name your user-folder eg: c:\users\John Doe where your log-in name is also John Doe, in that case go for the 2nd method.
If that is not so important to you then you can safely take the easy track with the 1st. method.
Both options present you the same result.
The following of this document will describe the 2nd method in detail.
You can equally follow the instructions on Microsoft TechNet: Configure a User Account
Method 2
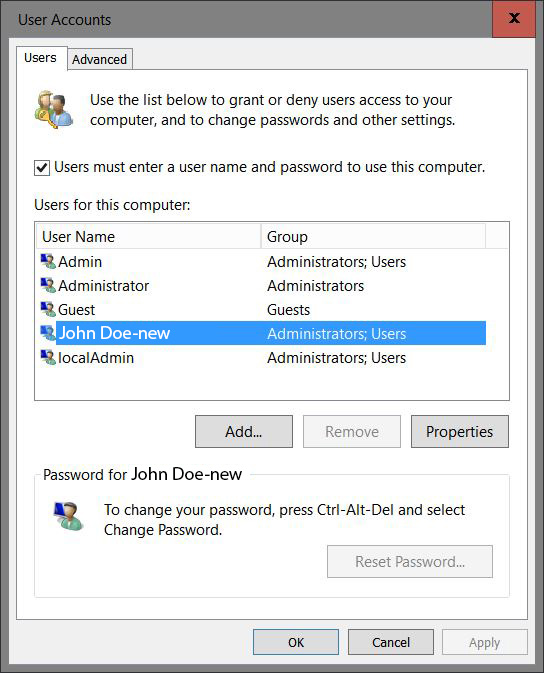
Logged in with your newly created local account press Windows-R and enter the word: netplwiz

If prompted for UAC (User Access Control) click Yes
In the User Accounts dialog, check Users must enter a user name and password to enter this computer, if it is unchecked.
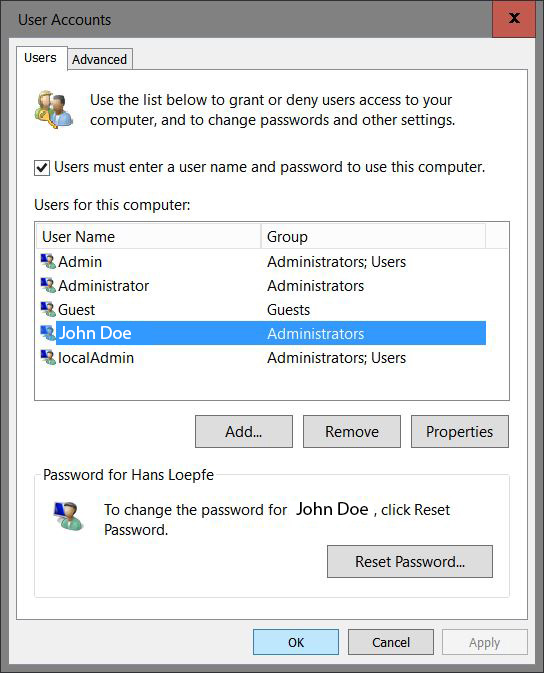
Select the user name you wish to change then press Properties.
Enter the user name. This is important: enter exactly the same user name as indicated in the users folder c:\users\John Doe !! Then click Apply.
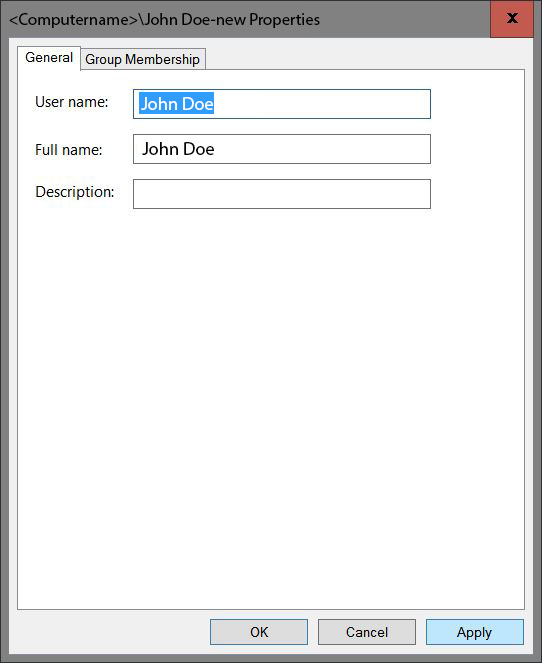
Observe how the name has changed. Double check that this is the name you really want. Unless you want to change the Password as well, press OK.
Restart your machine and log-in with your original local user account name that is no longer attached to the Microsoft account.
You’re done. Congratulations.
Trust is good control is better
Let’s see whether that really did what we anticipated.
Logged in open the Registry Editor. No, we are NOT going to change anything. Nevertheless be careful and make sure you don’t change anything - not even by accident.
We will want to make sure that the new account name created at the beginning is no longer there. After that we are going to inspect and verify three (3) important Registry keys.
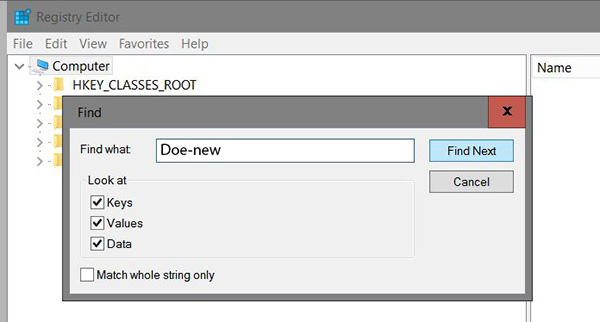
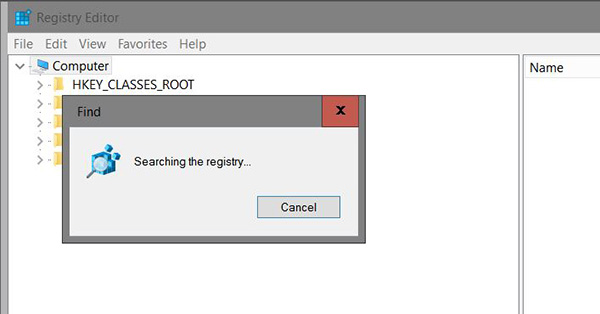
Let’s begin by searching the Registry for the value of the new account name.
The search term shall be unique enough: in this case Doe-new will do.
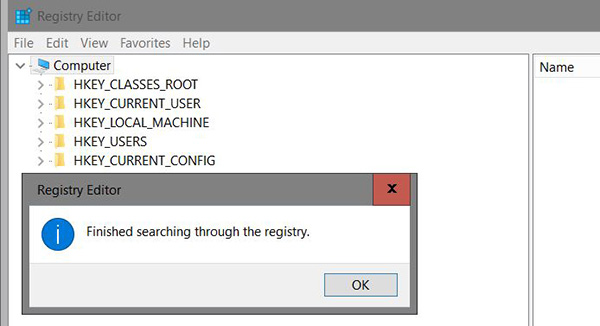
Alright, that looks very good. No new account name was found.
(In case it’s still there, then something went wrong. The most likely possibility is that you did not follow the instructions precisely. Start over from point zero meaning to restore your backup).
Registry Keys:
There are three keys we want to pay special attention to. All of them MUST display the original local user name.
If that isn’t the case, then something went wrong. The most likely possibility is that you did not follow the instructions precisely. Start over from point zero meaning to restore your backup).
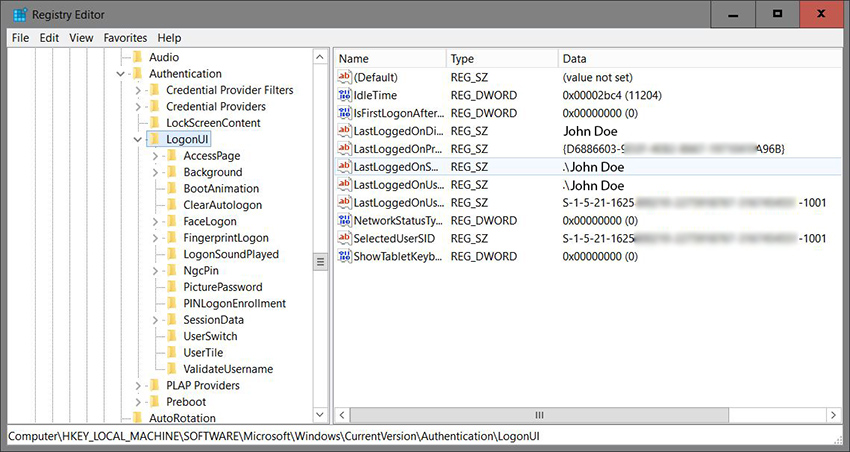
[HKEY_LOCAL_MACHINE\SOFTWARE\Microsoft\Windows\CurrentVersion\Authentication\LogonUI]
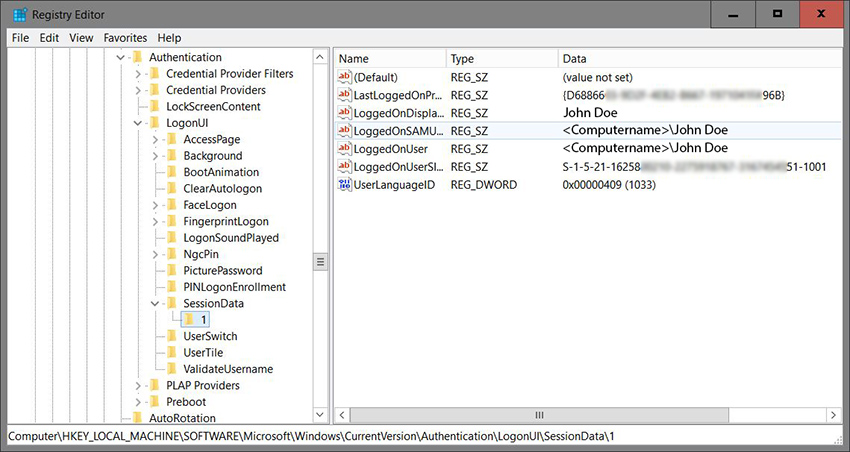
[HKEY_LOCAL_MACHINE\SOFTWARE\Microsoft\Windows\CurrentVersion\Authentication\LogonUI\SessionData\1]
Look at each key that is in SessionData \0, \1, \2, \3, …
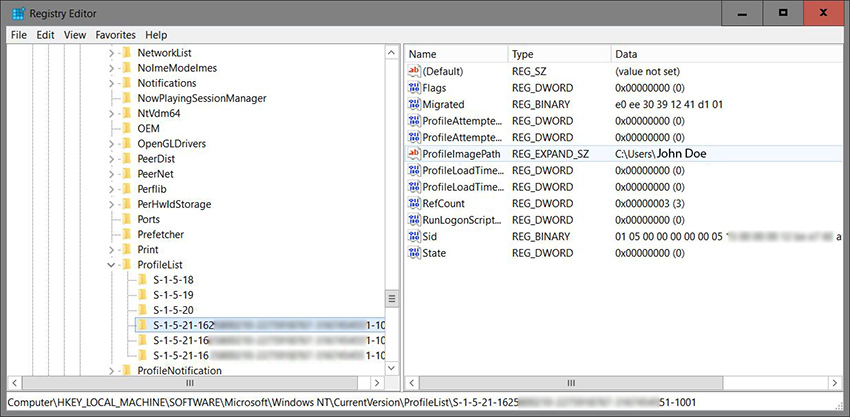
[HKEY_LOCAL_MACHINE\SOFTWARE\Microsoft\Windows NT\CurrentVersion\ProfileList]
In one of the entries with the large number there MUST be the original local user name. (if that is not the case, then restore your backup).
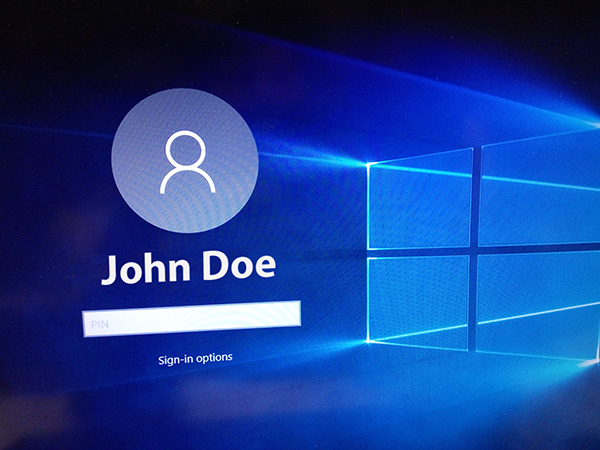
Provided you followed the instructions precisely all should be fine and well and the log-in screen shows your original user name of your local account on windows 10.
Final and last steps: Cleanup
After successfully disconnecting the Microsoft account from your local account, Windows will request special attention for some items, depending what you had connected with the Microsoft account.
Skip these last steps if you ever want to revert and use your Microsoft-accounts. If you want to free your machine from them then read on.
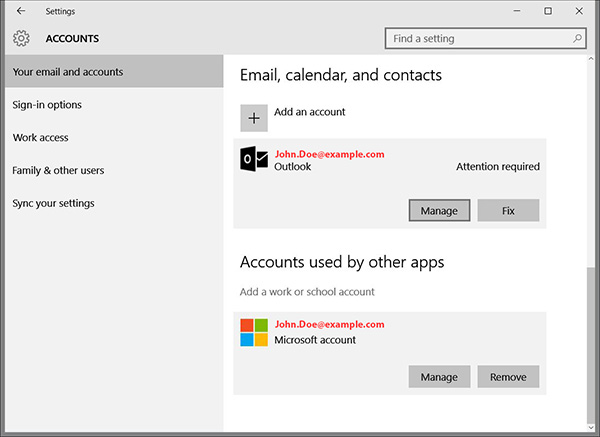
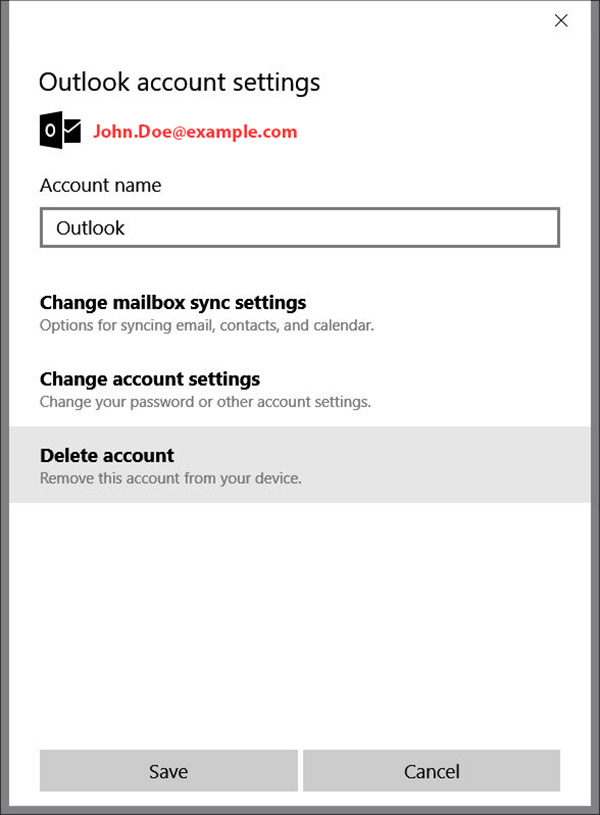
Remove Outlook
Select what you think is appropriate. No action required.
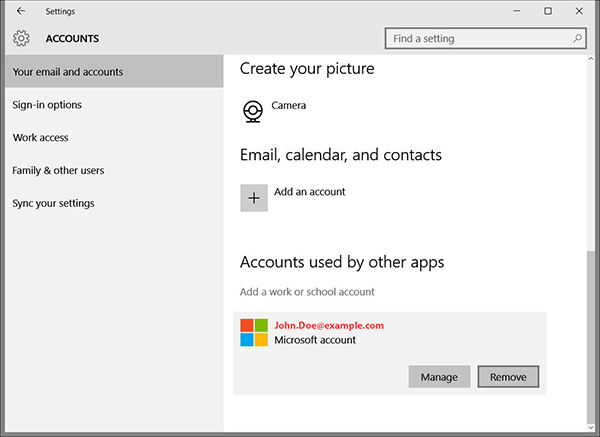
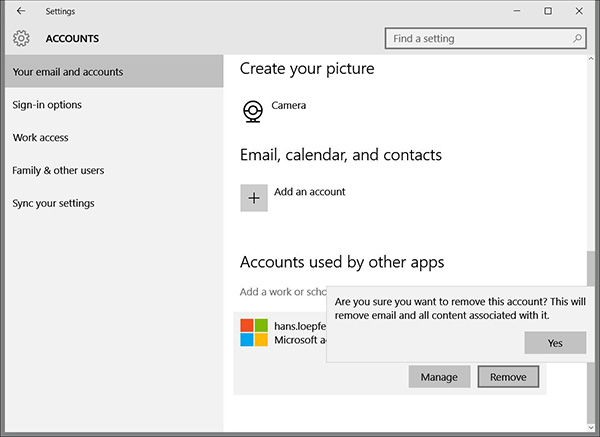
Remove the Microsoft Account
Select what you think is appropriate. No action required.
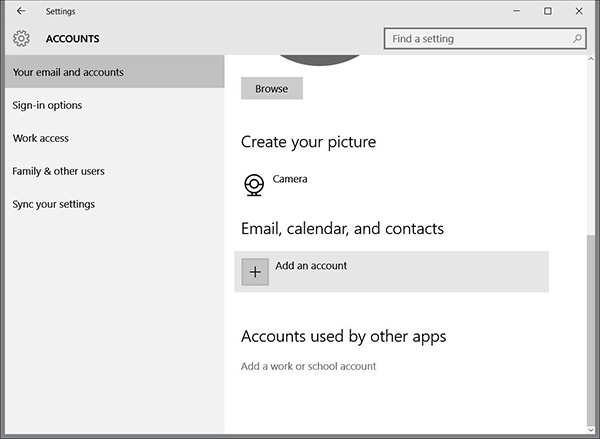
All gone – and done.
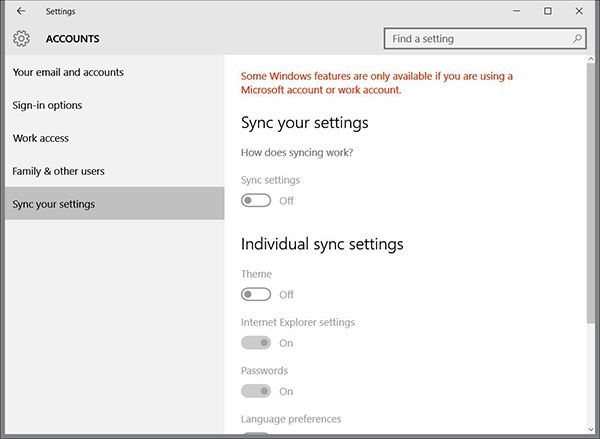
Sync Settings will turn off by itself once there is nothing left to be synchronized.
Additional information
As mentioned above applying Method 1 is really simple and leads pretty much to the same result. The difference can be seen in some registry key a clever way to mimic a comfortable user name. This can be very useful in corporate environments where user-ids often get the strangest names.
Registry keys and values applied by method 1
		[HKEY_LOCAL_MACHINE\SOFTWARE\Microsoft\Windows\CurrentVersion\Authentication\LogonUI]

		"ShowTabletKeyboard"=dword:00000000

		"LastLoggedOnProvider"="{D68xyz03-9xyz-4xyz-xyz7-19710xyzA96B}"

		"LastLoggedOnSAMUser"=".\\John Doe-new"

		"LastLoggedOnUser"=".\\John Doe-new"

		"SelectedUserSID"="S-1-5-21-162xyzxyz0-2xyz9xyz67-3167454551-1001"

		"IdleTime"=dword:00005767

		"NetworkStatusType"=dword:00000000

		"IsFirstLogonAfterSignOut"=dword:00000000

		"LastLoggedOnUserSID"="S-1-5-21-162xyzxyz0-2xyz9xyz67-3167454551-1001"

		"LastLoggedOnDisplayName"="John Doe"
		[HKEY_LOCAL_MACHINE\SOFTWARE\Microsoft\Windows\CurrentVersion\Authentication\LogonUI\SessionData\1]

		"LoggedOnSAMUser"="ComputerName\\John Doe-new"

		"LoggedOnUser"="ComputerName\\John Doe-new"

		"LoggedOnDisplayName"="John Doe"

		"LoggedOnUserSID"="S-1-5-21-162xyzxyz0-2xyz9xyz67-3167454551-1001"

		"LastLoggedOnProvider"="{D68xyz03-9xyz-4xyz-xyz7-19710xyzA96B}"

		"UserLanguageID"=dword:00000xyz
		[HKEY_USERS\S-1-5-21-162xyzxyz0-2xyz9xyz67-3167454551-1001\Volatile Environment]

		"LOGONSERVER"="\\\\ComputerName"

		"USERDOMAIN"="ComputerName"

		"USERNAME"="John Doe-new"

		"USERPROFILE"="C:\\Users\\John Doe"

		"HOMEPATH"="\\Users\\John Doe"

		"HOMEDRIVE"="C:"

		"APPDATA"="C:\\Users\\John Doe\\AppData\\Roaming"

		"LOCALAPPDATA"="C:\\Users\\John Doe\\AppData\\Local"

		"USERDOMAIN_ROAMINGPROFILE"="ComputerName"